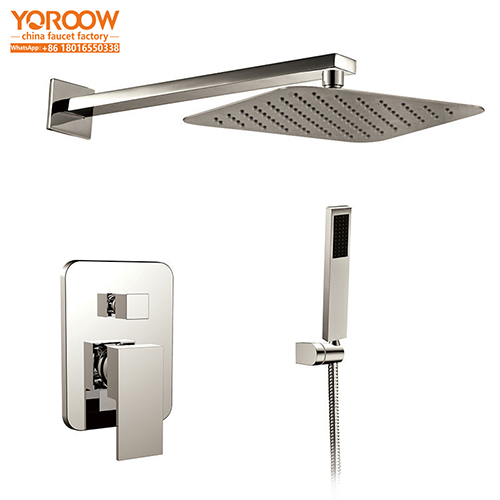
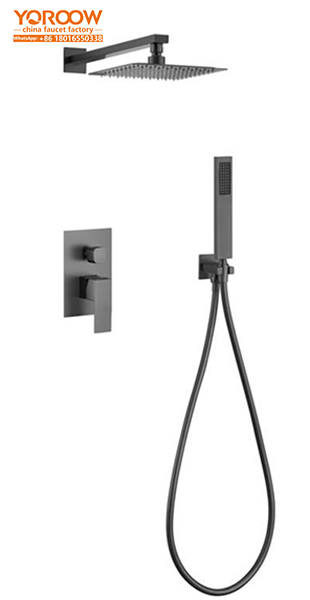
In the current trend of bathroom decoration, de inbouw thermostatische doucheset has won the hearts of many consumers who pursue quality life with its two “trump cards” – concealed installation and thermostatic control. The thermostatic mixing valve hidden in the wall, combined with a large – sized overhead shower, a flexible handheld shower, and the precise thermostatic effect brought by the high – precision thermal – sensitive valve core, can not only make every bathing experience enjoyable but also instantly make the bathroom look neat and sophisticated. And the sets produced by Chinese kraanfabrieken, made of high – quality brass or stainless steel, and offering a variety of surface treatments such as chrome plating, brushed gold, and gunmetal gray, can perfectly fit into high – end residences, luxury hotels, or exquisite private bathrooms. However, if you want to install this shower set smoothly, you’d better take a close look at the following detailed installation guide.
(I) Voorzorgsmaatregelen voor installatie van het product
Before preparing to install the concealed shower set, the first thing is to carefully “inspect” the bathroom wall. Tap the wall with your hand and listen. If the sound is dull, it means the wall structure is relatively solid; if the sound is hollow, you need to be cautious when installing, because such a wall has limited load – bearing capacity, and the shower may become loose or fall off after installation. In addition to the wall, the home water supply system also needs to be understood clearly. Generally, this shower set works best under a water pressure of 0.1 – 0.5MPa. If the water pressure is too high, it may cause water leakage at the shower interface; if the water pressure is too low, the water flow will be weak, and the bathing experience will be disappointing. Water quality cannot be ignored either. If there is often scale in the water at home, it is best to install a pre – filter in advance. Otherwise, over time, impurities will block the shower and valve core, and maintenance will be troublesome. Also, be sure to communicate with the decoration team in advance to determine the installation time. You don’t want the workers to be installing the shower here while still knocking down walls and laying tiles there. Not only will they interfere with each other, but it’s also easy to cause problems.
(II) Vereist installatiegereedschap
As the saying goes, “A craftsman who wishes to do his work well must first sharpen his tools.” To install the concealed shower set, the tools must be complete. First, there are electric drills and hole openers. These two are the “main forces” for making grooves and holes in walls. the wrench and screwdriver are used to tighten and disassemble various screws and components; the level is essential – without it, the installed shower will be crooked and look unpleasant; the tape measure is used to accurately measure the installation position and size; and the PTFE tape and sealant are the “shields” to prevent water leakage. Wrapping them around the interfaces and applying them to the gaps can effectively avoid water seepage problems in the future.
(III) Voorbereidingsstappen vóór installatie
After unpacking, don’t rush to start working. Carefully check the accessories to see if the concealed thermostatic mixing valve, showerhead, control panel, screws, and instruction manual are all there and if there is any damage. After confirming that the accessories are complete, you can start “marking” on the wall. Refer to the product installation drawings and combine with the actual bathroom space. Use a tape measure and level to determine the installation position on the wall. The center of the mixing valve is approximately 1.1 meters from the ground, a height that is convenient for daily temperature adjustment; the overhead shower is preferably 2.2 – 2.4 meters from the ground. If it’s too high, the water will lack force when it comes down; if it’s too low, it may hit your head. After marking the position, clean the installation area with a broom and rag. If the dust and debris on the wall are not cleaned off, it will affect the installation effect.
(IV) Standaard installatieproces
The installation officially begins. First, use an electric drill and a hole opener to make grooves and holes in the wall according to the marked positions. When making grooves, extra care must be taken to control the depth and width well. Under no circumstances should the steel structure in the wall be damaged, otherwise it will affect the safety of the house. After the slots are made, connect the cold and hot water pipes to the interfaces of the mixing valve according to the principle of “hot on the left, cold on the right.” When connecting, remember to wrap several layers of PTFE tape to ensure a tight seal at the interface. After connecting the pipes, use a level to check whether the mixing valve is horizontal. If it’s a bit crooked, adjust it immediately, otherwise, the water flow may be uneven in the future. Next, install the overhead shower. Fix it in the pre – reserved position on the ceiling and tighten the screws firmly to prevent it from falling off during use. Finally, install the handheld showerhead and control panel, connect the water pipes, turn on the water source, and test whether the switches are flexible and the water flow is smooth.
(V) Gebruikstests en inspectie Belangrijke punten
Completing the installation is not the end – there is an important testing process. First, turn on the water source and carefully check all the connection parts, such as the interface of the mixing valve and the connection parts of the showerhead, to see if there is any water seepage or dripping. If you find any water leakage, no matter how small, deal with it in a timely manner. Then, test the thermostatic function. Set the water temperature to a suitable level, such as 40°C, and then turn the faucet on and off repeatedly, or turn on other water – using devices at home to simulate water pressure fluctuations and observe the change in water temperature. Under normal circumstances, the water temperature fluctuation should be controlled within ±2°C. If the temperature difference is too large, you need to check whether the thermal – sensitive valve core is malfunctioning. Finally, test different water outlet modes, feel the rain – shower effect of the overhead shower and the massage water flow of the handheld shower, and check whether the water outlet is uniform and if there is any blockage.
(VI) Vaak voorkomende installatieproblemen en oplossingen
During the installation process, it’s inevitable to encounter some small troubles. If you find water leakage at the interface, don’t rush to disassemble and reinstall. You can try to re – tighten the PTFE tape or apply another layer of sealant to the gap. If the water temperature is inconsistent and unstable, it may be due to a faulty thermal – sensitive valve core. In this case, it’s best to contact a professional maintenance person to check and replace it; it may also be caused by unstable water pressure, and in that case, you can consider installing a pressure – stabilizing device. If the water flow from the showerhead becomes weaker, it’s likely blocked by impurities. Remove the showerhead, soak it in a mixture of white vinegar and water for a while, and then gently scrub it with a soft brush to solve the blockage problem.
(VII) Veiligheidstips en onderhoudssuggesties
 Throughout the installation and use process, safety always comes first. Before installation, make sure the power supply is turned off to avoid the risk of electric shock during operation. During daily use, wipe the surface of the showerhead and mixing valve with a soft cloth every once in a while to prevent the accumulation of scale and stains, which can affect both the appearance and the use effect. Check the connection screws of each component every few months. If you find any looseness, tighten them in time. If you don’t use the shower for a long time due to business trips, vacations, or other reasons, remember to turn off the main water valve and drain the water in the pipes, especially in cold winters. This can effectively prevent the pipes from freezing and cracking.
As long as you follow the above steps and key points, even an installation novice can successfully complete the installation of the concealed thermostatic shower set. Choosing products produced by Chinese kraanfabrieken, with their reliable quality and considerate after – sales service, will allow you to enjoy a high – quality bathing life with peace of mind.