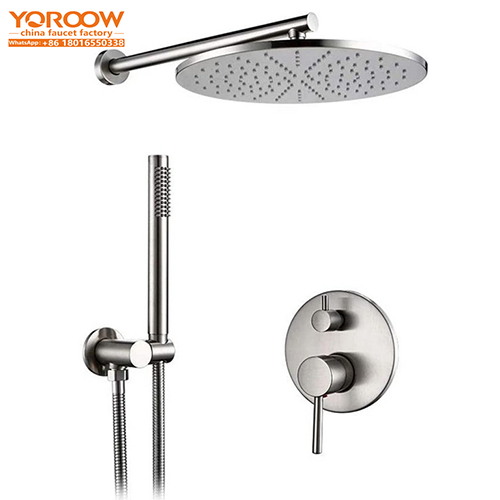
The concealed brushed gold wall mounted rainfall shower set has become a popular choice for high-end residences, star-rated hotels, and luxurious bathrooms due to its simple and modern wall-mounted design and luxurious brushed gold appearance. It adopts a concealed installation method, cleverly embedding water pipes and control components into the wall, only presenting highly textured shower components. Coupled with the immersive bathing experience brought by the large-sized overhead rainfall showerhead, it adds a touch of elegance to the bathroom space. The shower sets produced by Fábricas de torneiras chinesas are not only of excellent quality but also endow the brushed gold finish with properties such as corrosion resistance, oxidation resistance, and fingerprint prevention through the PVD coating technology, ensuring that they remain shiny and new after long-term use. To help you complete the installation smoothly and fully utilize the product’s performance, the following is a comprehensive installation guide.
I. Precautions Before Product Installation
Before installing the concealed brushed gold wall mounted rainfall shower set, it is necessary to confirm the load-bearing capacity and structure of the bathroom wall. This shower set uses a wall-mounted installation method, which has high requirements for the wall. It is recommended to choose solid brick walls or concrete walls for installation, and avoid installing on hollow brick walls or lightweight partition walls to prevent the shower set from falling due to insufficient load-bearing capacity. At the same time, carefully check the accessory list in the product packaging to confirm that it includes components such as a handheld shower, thermostatic mixing valve, independent water outlet control switch, overhead showerhead, installation screws, and sealing rings. If any parts are missing, contact the after-sales personnel of Chinese faucet factories in a timely manner. In addition, plan the position and direction of the cold and hot water pipes in advance to ensure they match the product interfaces. Generally, the cold water pipe is on the left, the hot water pipe is on the right, the height from the ground is usually about 1.1 meters, and the center distance between the two pipes is 15 centimeters.
II. Required Installation Tools
A variety of tools are needed to install this shower set. Basic tools include an electric drill, wrenches, and screwdrivers, which are used for drilling holes, tightening screws, and installing fixed components. A spirit level can ensure that the shower set is installed horizontally and avoid tilting, which may affect the use. A tape measure is used to accurately measure the wall position and the distance between the water pipes. Thread seal tape or sealant is used to seal the water pipe interfaces to prevent water leakage. In addition, rubber gloves can be prepared to protect your hands from scratches during operation.
III. Preparation Steps Before Installation
First, turn off the main water valve at home and empty the remaining water in the pipes to avoid water spraying during the installation process. Then, mark the installation hole positions and water pipe interface positions on the wall according to the product installation drawings to ensure the markings are accurate. Next, use an electric drill to drill holes at the marked positions. The depth and diameter of the holes should match the expansion screws. Generally, the hole depth is 5 – 10 millimeters deeper than the length of the expansion screws, and the diameter is slightly larger than the outer diameter of the expansion screws. After drilling, clean the dust and debris in the holes and knock the expansion screws into the holes.
IV. Processo de instalação normalizado
First, install the thermostatic mixing valve. Connect the interface of the mixing valve to the pre-embedded cold and hot water pipes and tighten them with a wrench to ensure a firm connection. At the same time, wrap thread seal tape or apply sealant to enhance the sealing. Then, install the independent water outlet control switch, fix it at the appropriate wall position according to the instructions, and connect the control lines. Next, install the large-sized overhead rainfall showerhead. Fix the showerhead bracket at the installation hole position on the wall with screws, and then connect the showerhead to the bracket, ensuring a firm installation and the correct water outlet direction. Finally, install the handheld shower. Connect one end of the handheld shower hose to the water outlet of the mixing valve and the other end to the handheld showerhead, and pay attention to the sealing treatment.
V. Usage Testing and Inspection Key Points
After the installation is completed, turn on the main water valve and check whether there is any water leakage at the water pipe interfaces. You can observe whether there are water droplets oozing around the interfaces or check by wiping with a dry cloth. Test the temperature control function of the thermostatic mixing valve. Adjust the water temperature and check whether the water temperature can be stabilized at the set temperature to avoid sudden changes in temperature. At the same time, test the water output effect of the overhead showerhead and handheld shower, check whether the water flow is uniform and smooth, and whether there are any blockages or poor water flow problems. In addition, check whether the installation of each component is firm. Shake the shower set to confirm that there is no looseness.
VI. Common Installation Problems and Solutions
If there is water leakage at the water pipe interface during the installation process, it may be due to poor sealing. You can re-wrap the thread seal tape or apply sealant and then tighten the interface. If the water output of the overhead showerhead is uneven, it may be blocked inside. You can soak it in white vinegar or clean the water outlet holes with a special cleaner. If the temperature control of the thermostatic mixing valve is inaccurate, you can refer to the product manual for temperature calibration or contact the professional after-sales personnel of Chinese faucet factories for debugging.
VII. Safety Tips and Maintenance Suggestions
During the installation and use process, be sure to pay attention to safety and avoid live operations to prevent electric shock accidents. Regularly check each component of the shower set. If the screws are loose, tighten them in a timely manner. If the sealing ring is aging, replace it promptly to prevent water leakage. For daily cleaning, use a soft wet cloth to wipe the brushed gold surface, and avoid using cleaners containing acidic or abrasive ingredients to prevent damage to the PVD coating. If not used for a long time, it is recommended to turn off the main water valve and empty the water in the pipes to extend the service life of the shower set.
Through the above detailed installation guide, we hope to help you complete the installation of the concealed brushed gold wall mounted rainfall shower set smoothly. Chinese faucet factories are always committed to providing users with high-quality products and considerate services. If you have any installation or usage problems, please feel free to contact us.